We are living in the video world. More and more services show up offering live video and audio streaming. Facebook has tried to take a piece of this market and opened up their Go Live (Video Live Streaming) feature. They’ve already started hitting hard on the video market per-say. So going live on facebook was just a matter of time.
Why Go Live? Why not simply upload your video from the phone that you’ve filmed just now onto facebook and be happy? Live streaming is still fresh, it attracts more viewers, they want to know what’s up, why you’re going live now.
Plus facebook offers posts with live video to many more of your friends and followers, thinking, they go Live – means that’s something important. And so it goes offering your live stream to more possible viewers. Live streams attract 2-3 times more viewers than videos uploaded into your Facebook video folder.
There are multiple ways to do a live stream on facebook. The easiest – use the facebook app on your smartphone and simply film something and it’ll be sent live to facebook. Very easy. But not always useful.
Especially when you already have your video pre-recorded as .MP4 or .FLV video file. In this tutorial you will learn how to set up a live stream to Facebook from your Linux or Windows VPS and let the machine do all the work.
Step 1. Prerequisites of going Live on Facebook
- Facebook Page or Facebook Account/Group, where your video will belong after it ends.. Live Streaming to a page is very easy. While live streaming to your Facebook personal account or Group is much more complex.
- install ffmpeg – the only piece of software you’ll need. Use this page to download and install ffmpeg on Unix platform. If you have Windows Server – visit this resource to download a zip file, which you can then unpack and have precompiled ffmpeg.exe ready for you. Place it somewhere in any %PATH% listed folder.
Why this tutorial? There are so many programs that offer this feature and are easier to use?
Because this is a totally free option. Using this method, you will not need to pay anything to anyone, just for your server. Plus in reality all the software packages that deal with live streaming are based on ffmpeg. It’s true, ffmpeg is an open source project supported by thousands of programmers all over the world.
FFMpeg always has the fastest technology up it’s sleeve. ffmpeg is the best for video/audio manipulation. It’s just a bit complicated to use it with all the parameters and all.. But don’t worry, here we’ll need a bare minimum..
Step 2. Now let’s get to actual Live Video Streaming
Setting up a live stream on Facebook at this point becomes piece a cake. The hardest part above was actually installing ffmpeg on a linux-based VPS. Also please note, Live Stream doesn’t have to cover something happening right now.
Live Video Stream generally means a video stream happening right now that one can tune into and watch, Live Streams are usually not available on demand after they end. Facebook does offer an option to save or delete all the recorded video of your live stream after it ends as a static Facebook Video post.
Step 2.1 Set up Live Stream on Facebook
- Login to your facebook account, preferably on a desktop computer (to avoid possible intention of facebook app to stream video from your smartphone’s camera).
Now… We shall look into streaming to your page, as it is much easier. Live Streaming to your personal account is really complicated for most people to accomplish. It requires use of Facebook API, it needs special scripts to be set up and eventually presents itself as a post to your page. Generally though people Go Live using their smartphones or tablets with Facebook App, while live streaming from a server with a pre-existing video is done by businesses and performers under the “disguise” of their Facebook Page. And we continue: - Open a Facebook Page that you manage (usually referred to as fan page, or your business page). Then open Videos section, locate Video Library button and click on it. Here it is – the Go Live button that is now shown as + Live (Plus Live). Click that button to set up your Facebook Live Stream.
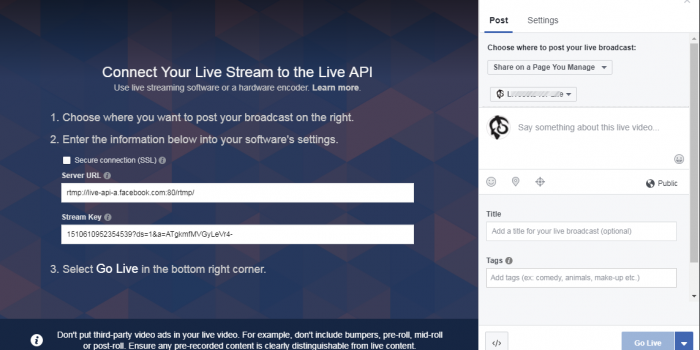
- On the next screen, click in the Single Field box and copy the Long Long URL that starts with rtmp://, it will look something like this:
rtmp://live-api-a.facebook.com:80/rtmp/1510610952354539?ds=1&a=ATgkmfMVGyLeVr4-
here’s a screenshot.. it has URL split into 2 parts now..
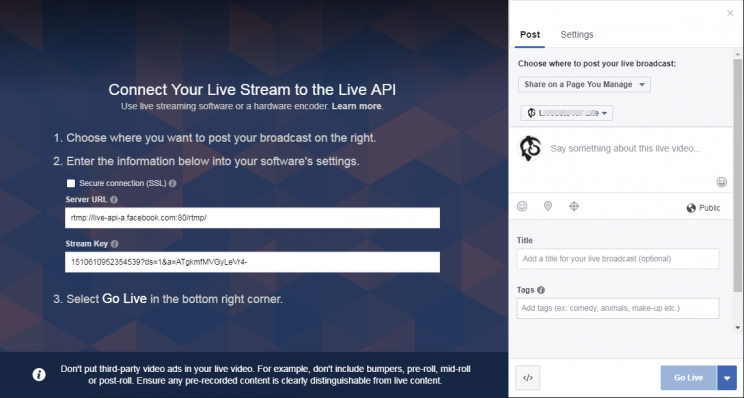
as you can see on the screenshot below, at the time of writing this article (october 2017) facebook now presents information in one step and the url is now listed as 2 parts: Server URL and Stream Key. Those are just 2 parts of the URL above. In our case, and on the photo, they are:
Stream URL: rtmp://live-api-a.facebook.com:80/rtmp/
Stream KEY: 1510610952354539?ds=1&a=ATgkmfMVGyLeVr4-
This URL is important because it will accept the video feed from your VULTR VPS server and broadcast it live on Facebook. We will call this FACEBOOK-RTMP-URL below.
* Click Next and Facebook is ready for your live stream.
Step 2.1 Start Video Stream on your server
At this point you only have 1 last step left. On your server you need to start the video stream that’ll relay itself to Facebook. This is accomplished with ffmpeg, and all you need to do is run the following command:
ffmpeg -re -i "PATH-TO-VIDEO-FILE" -c copy -f flv "FACEBOOK-RTMP-URL"
ffmpeg -re -i "/videos/Company Picnic Video.mp4" -c copy -f flv "rtmp://live-api-a.facebook.com:80/rtmp/1510610952354539?ds=1&a=ATgkmfMVGyLeVr4-"
After running this command, check your facebook live page, for a moment it will display “Fetching Video Stream” notification as the one below:

Second line/command relates to my personal case. Final command for you will look something like this too (for linux! please, remember, Windows uses different path notation). Best don’t forget quotes around video-file and rtmp-url to make sure filename with spaces can be interpreter properly by the system and none of the trailing parameters are lost from the URL.
Now go back to Facebook, give it a moment and video should show up in the preview box. All you need to do after is press GO LIVE button and your Live Video Broadcast will commence. It will be listed as a post in your facebook page’s feed. Go ahead, share it and re-share, people need to know you’re live!! And later, everyone can get the video with this facebook video downloader!!
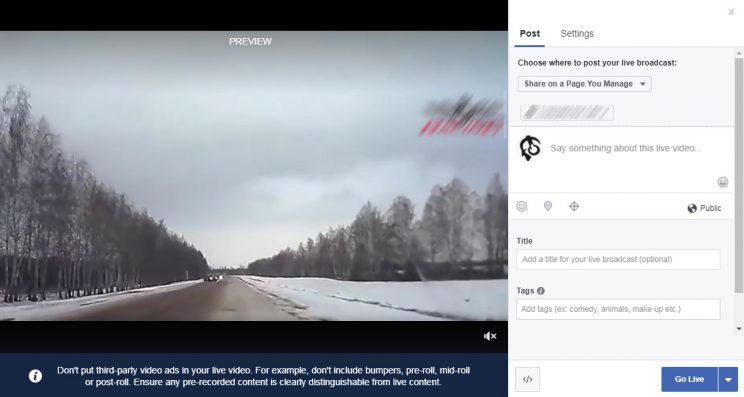
as the image shows, all we have to do now is press GO LIVE and the video will start live streaming on the page of our choice.
Why stick with ffmpeg when live streaming to Facebook?
As mentioned before, it’s free. It is complex and full of options and parameters. If you’re not savvy with linux or windows command line – you’ll definitely feel important having tamed the wild ffmpeg.. Here are some other “pros”:
- You can start live broadcast and go about your business. ffmpeg and your server will continue work for you, when stream finishes nothing needs to be done, video will automatically be saved by Facebook (unless you want it deleted, which will also happen automatically)
- Any video quality or format can be streamed this way, leave it to ffmpeg to figure out what to do, as long as the output is formatted as
-f flv(that we used there in command) and sent to Facebook rtmp service. - You can instantly re-stream this video – simply start another live video on Facebook, and run same command (don’t forget to replace the FACEBOOK-RTMP-URL there with the new one).
- You can have several live stream simultaneously. Just run several instances of your shell access script (or command processor cmd for windows), and start several live feeds on Facebook, properly copy-paste all the rtmp urls and voila – you can have 10 live streams on facebook with your favorite summer vacation videos. Well, 10 maybe overdoing it, but still – it is a possibility.
- ffmpeg is very versatile. it can accept its input (part with
-i "PATH") from a live stream, so it is possible to run your live Minecraft or Call Of Duty playing stream on Twitch, for example. and have it re-streamed to facebook with your VULTR VPS. simply find the elusive m3u8 link for source video stream and replace the PATH in command above with this live Twitch stream URL, and again in just 2-3 steps you can have a live Facebook video that is being re-streamed from your live Twitch game session or any other live stream that you have access to.
Conclusion
Above we looked into live streaming onto the most popular social platform and how to accomplish it using the free multiplatform software program called ffmpeg. Streaming happens to facebook pages, it is easy and fast to setup. And did i mention that it’s free? No need to pay anyone to use their software. Beautiful!
Thanks for reading this article and Happy Live Streaming for you!

you can use this website to download Facebook video easily
https://www.videofk.com/facebook-video-download
hope it helps you. Thanks for reading 🙂
How can I install ffmpeg? What OS is neccesary? Ubuntu, CentOS? Thanks!